I. INSTALLATION TOOLS
A. Utility Knife
B. Scissors
C. Sand Paper and/or File
D. Fabric Tucking Tools (available from dBFabb)
1.Rocker Tool
2.Flat Blade with round edge
3.Bent Blade with round edge
4.Roller Blade (Pizza Cutter)5.1-1/2” Putty Knife
E. Track Cutting
1. 8” or 10” Miter Saw
a) Saw Blade should be “Ultra Thin” for cutting plastic, with 200 teeth per blade. We recommend the 10” plastic blade with 200 teeth. Do not use a carbide tip saw blade, use a plywood blade.
F. Track Attachment
1. For attaching to drywall we recommend an 18 Ga. 3/8” Crown Stapler.
a) Staples: 3/8” crown, 1” length, 18 Ga.
2. If a stapler is not available the track can be screwed through the drywall into blocking, using pan head sheet metal screws every 1”-2” max.
3. For attaching track to surfaces other than drywall your tool requirements will vary. If you have any questions, please call dBFabb.
II.LAYOUT
A. Layout perimeter of wall by striking/snapping lines. Layout perimeter first.
B. Layout mid-wall (vertical joints) in the same manner.
III. PRE-WRAP
A. Pre-wrapping track, if necessary, must be done before attaching the track to thewall.
B. Cut miters for track intersections and corners per section IV. A.
1.Pattex adhesive on side and bottom of track – do not spray face of track(fig. 3.1).
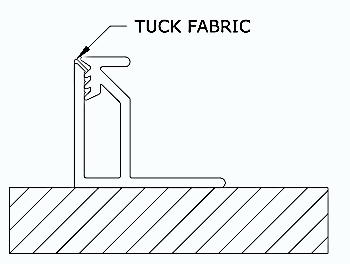
2.Adhere fabric to track, roll around edge (fig. 3.2) and tuck fabric into track(fig.3.3).
Fig. 3.1

Fig. 3.2
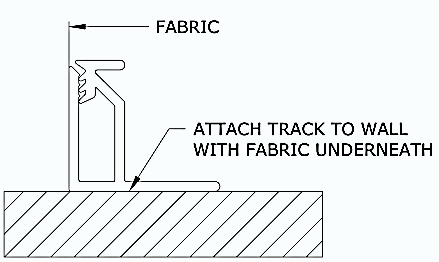
Fig. 3.3
IV. TRACK INSTALLATION
NOTE: Off-all must be used.
A. Cut miters for track intersections and corners. Start at an outside corner of the Perimeter Track and work your way around (fig. 4.1). Due to tolerances in the track extruding process, shimming or sanding may be necessary for proper alignment.
B. Install Perimeter Track. Securely fasten track to walls using staples and/or screws. Staples should be every ¼” – ½” and should be shot into drywall at different angles to help hold the track securely in place. Place a screw into stud locations. (fig. 4.3)
C. Miter and install Mid-wall Track, starting at the top and working down. Staples should be every ¼” – ½” and alternate sides. Place staples at varying angles to help hold the track securely in place. (fig. 4.2 & 4.4)
Fig. 4.1

Fig. 4.2
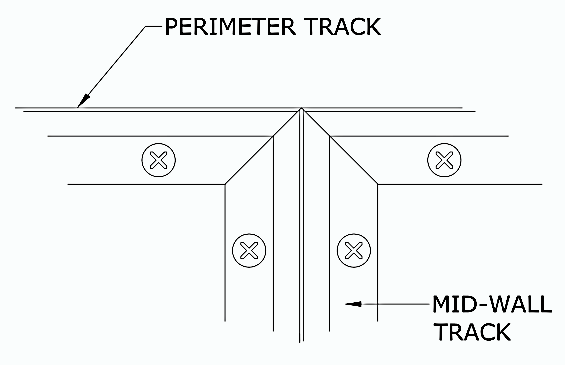
Fig. 4.3

Fig. 4.4

V. CORE INSTALLATION
NOTE: Off-all must be used.
A. Fiberglass Core
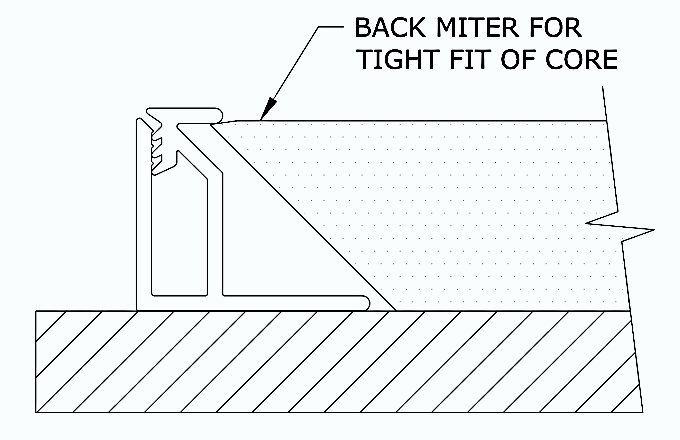
1.Cut fiberglass 3/16” oversize to ensure there are no gaps between the core and track.
2.Back cut / miter edges of fiberglass at 45° using a utility knife (fig.5.1)
3.Glue fiberglass core to the wall with a thin layer of adhesive.
B. Mineral Fiber Board Core
1. Cut fiber board to fit. Cut edges square, there is no need to back miter. Staple core to the wall with track stapler.
VI.STRETCHING FABRIC
A. Cut pieces of fabric 6” to 8” wider and longer than the area to be covered.
B. Start at the top of the section to be covered, at the center of the track, and tuck fabric in both directions, alternating sides, out to the corners.
1.There should be 2” – 3” of extra fabric hanging out of the track – leave this to be trimmed later as it may be necessary for corrections later.
2.Be sure to keep the fabric weave and pattern straight and consistent as you tuck.
C. Tuck bottom of fabric into the center of the bottom track and tuck in the same alternating sequence as the top. Leave excess fabric untrimmed and loose.
D. Tuck the sides of the fabric in the same manner as the top and bottom (B&C),always starting the process in the middle of the track section.
1.Use care at the corners not to rip the fabric.
E. When all sides and corners are tucked, double check the fabric weave to ensure it is straight and consistent in both directions. Make sure all corners look good.
F. Use scissors to trim the excess fabric, leaving approximately ¼” from the edge of the track.
G. Tuck final ¼” of fabric into the track using the same method as above (BD). Use care at the corners.
H. Trim any remaining loose threads